

This guide covers connector release 17.0.1.2.5. The workflow is shared across Odoo 17–19; changing the version loads that release’s screenshots and installation references. Your theme and installed apps may change the layout.
Before you start
The connector exchanges files with Elastic B2B over SFTP. It exports product, customer, catalog, pricing, inventory, and sales-representative data, and imports orders into a reviewable staging workflow. Agree on the feeds and identifiers with your Elastic implementation contact before connecting.
- A compatible Odoo environment. Use Odoo.sh or a self-hosted installation that permits Python addons. Odoo Online does not support this custom module. Odoo hosting requirements ↗
- The matching connector package. For Odoo 17, use the
17.0series. A package for another major Odoo version cannot be substituted. - An Odoo administrator and server/deployment access. Your hosting partner can install the package and Python dependency if you do not manage the server.
- Elastic’s connection details. Request the sandbox and production hostnames, port, username, authentication method, verified server host-key fingerprint, and three directory paths. Confirm file names, columns, delimiters, date formats, and polling expectations.
- A small test assortment. Choose a customer with a delivery address, a few product variants, a catalog, and one pricelist. Check the expected quantities and prices before sending anything.
Install the connector & grant access
- Start in a test database. Back up an existing database before installing or upgrading. Obtain the Odoo 17 connector package from your purchase or P2 delivery.
- Deploy the addon. On Odoo.sh, add the
p2_elastic_integrationfolder to your project’s addons repository on a development or staging branch. Addparamiko>=3.4.0to the repository-rootrequirements.txtand let the build complete. - For self-hosted Odoo, place that folder in a configured addons path, install its
requirements.txtinto the Python environment running Odoo, and restart the Odoo service. Your hosting administrator should handle these server steps. - Install in Odoo. Activate developer mode, open Apps → Update Apps List, then search for Elastic B2B Connector and install it. The module depends on Contacts, Sales, and Inventory components; Odoo installs missing dependencies.
- Grant access. In Settings → Users & Companies → Users, open the responsible user and assign Elastic / Manager for setup. Give day-to-day operators Elastic / User. Also grant the Sales, Inventory, Contacts, or product-management access their work requires. Save and reload Odoo.
Managers can change connections, credentials, and settings. Elastic users can read configuration, run exchanges, manage cross-references, and review or retry staged orders. Core Odoo access rights still apply.
Connect to your Elastic sandbox
- Open Elastic → Configuration → SFTP Connections → New. Give the connection a recognizable name and select Beta / Sandbox.
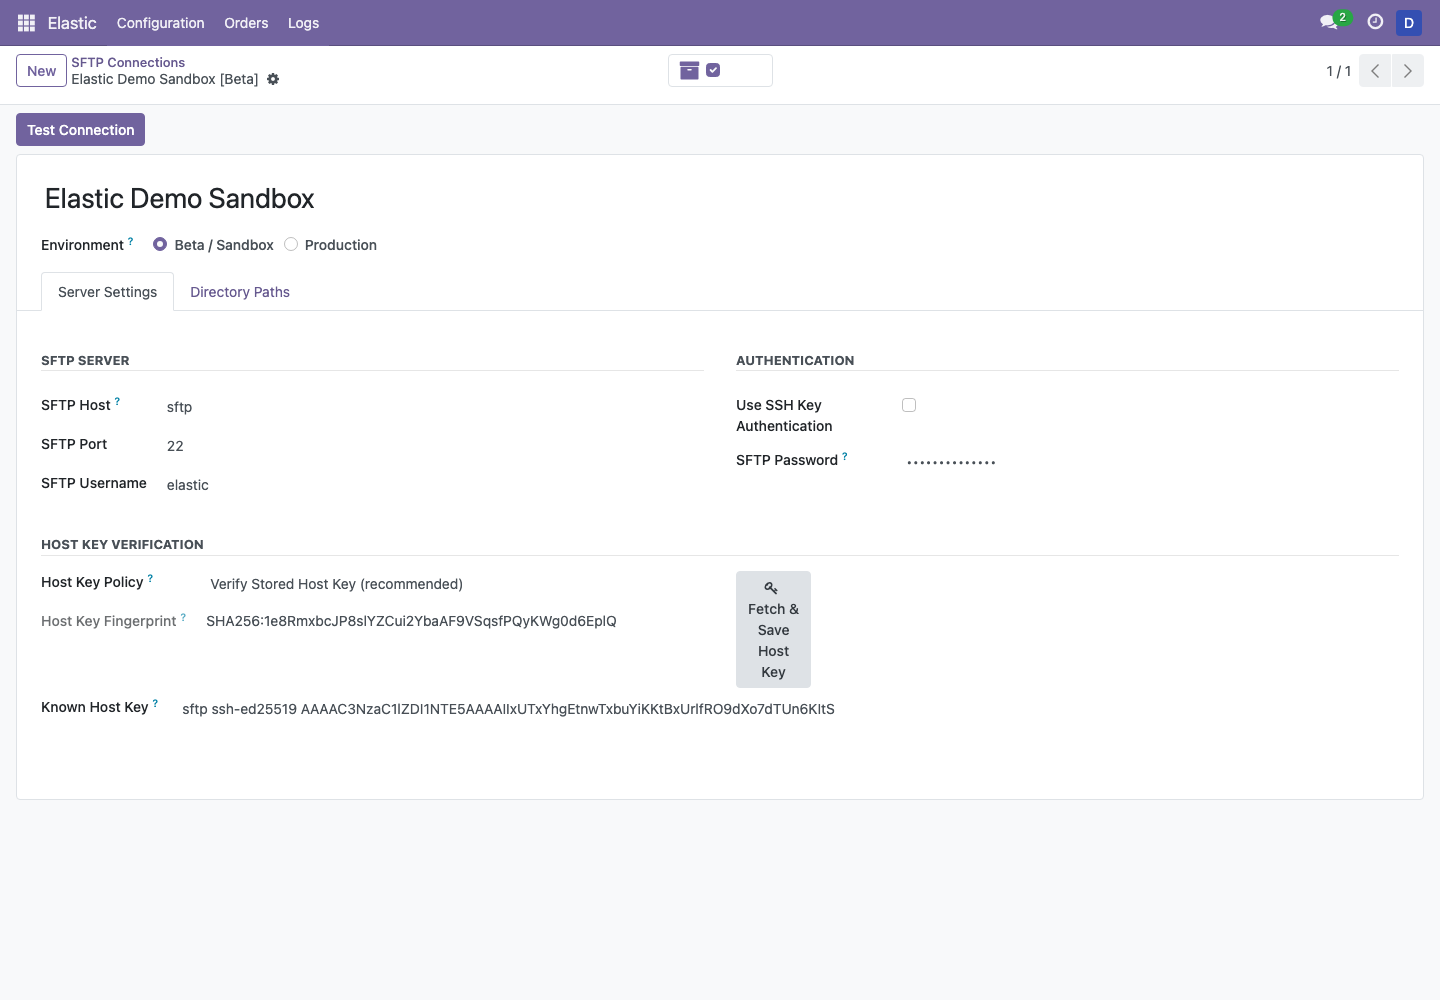
- Under Server Settings, enter the host, port (usually
22), and username provided by Elastic. Enter the password, or enable private-key authentication and supply the supported private key. - Set up host-key verification before testing. If Elastic supplied the complete known-host key line, paste it into Known Host Key and save with Verify Stored Host Key. If you only have a fingerprint, temporarily select Trust on First Connect to save the new profile, then immediately click Fetch & Save Host Key; this stores the key and switches the policy to verified mode. Compare the captured fingerprint with Elastic’s fingerprint through a trusted channel before clicking Test Connection or running any exchange. If it does not match, stop and verify the endpoint with Elastic.
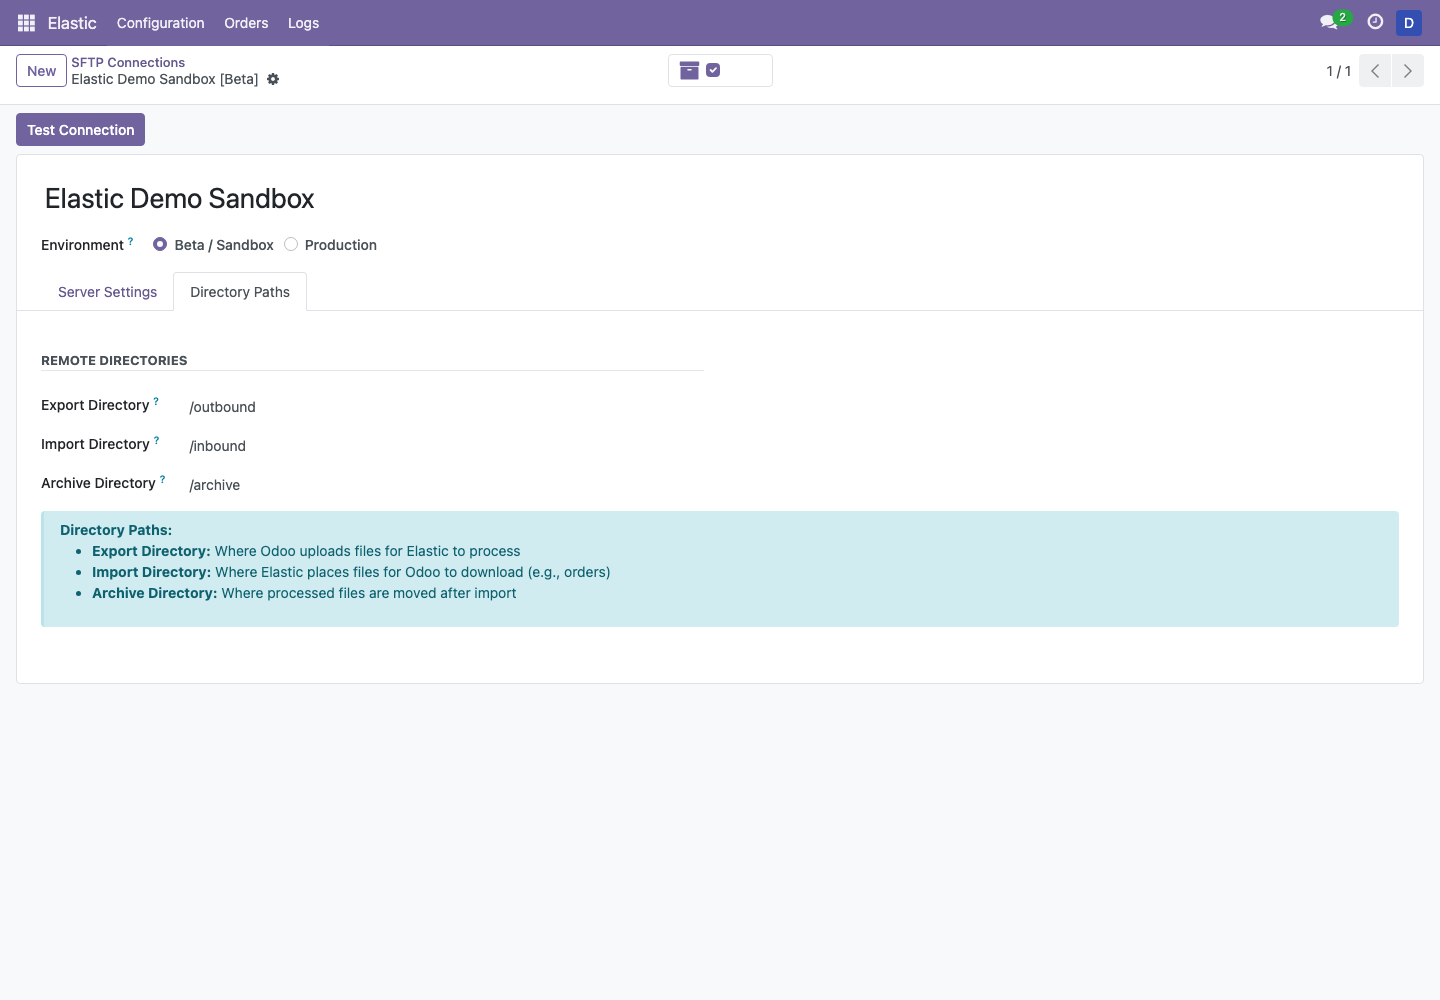
- Under Directory Paths, enter the actual remote directories. They must already exist and the account must have the appropriate permissions. Save and click Test Connection.
 View full size ↗
| Directory | What it is used for | Demo value |
|---|---|---|
| Export | Odoo uploads feeds for Elastic to read. | /outbound |
| Import | Odoo reads order files placed by Elastic. | /inbound |
| Archive | Imported files are moved here when archiving is enabled. | /archive |
Directory names are from the connector’s perspective. Your SFTP provider may use different names or a restricted home directory; use the paths visible to the supplied login.
See the directory setup example
 View full size ↗
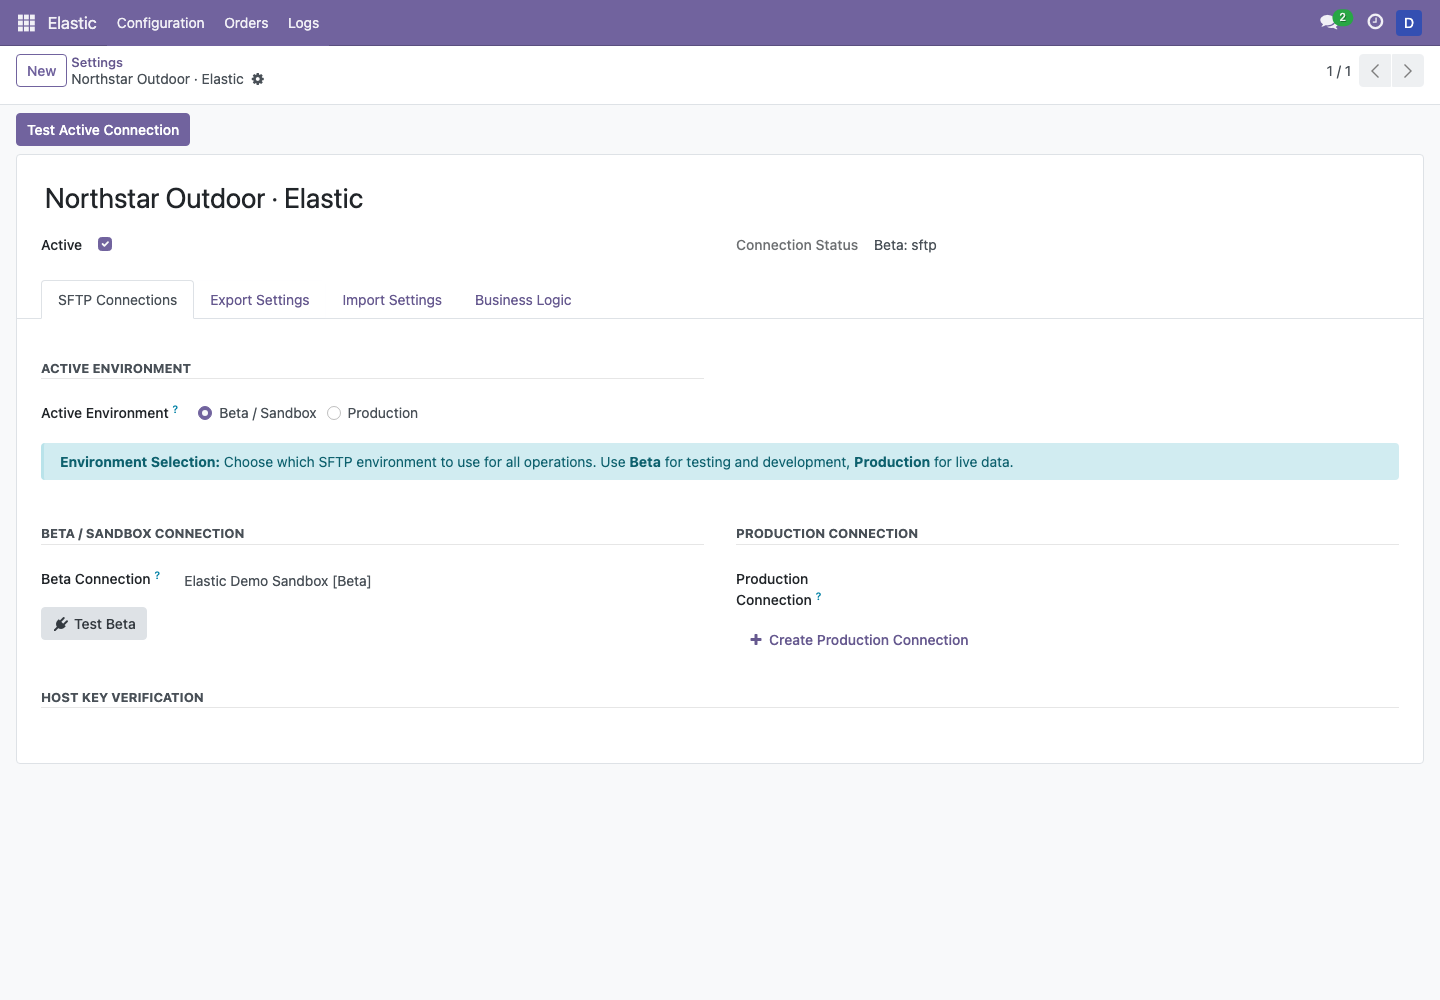
- Open Elastic → Configuration → Settings. Create one configuration if none exists; only one configuration can be active.
- On SFTP Connections, select Beta / Sandbox as the active environment and choose the saved profile in Beta Connection. Save and click Test Active Connection.
 View full size ↗
Prepare products, catalogs & prices
Give every variant a dependable identifier
In Sales → Products → Products, open each test product. On its Elastic tab, review Push to Elastic and set the style-level Elastic ItemNumber if Elastic uses a specific style identifier. Review Push Variant to Elastic on each variant as well. Give each sellable variant a unique Internal Reference (SKU) or barcode that matches the incoming order file.
Configure color and size values in Sales → Configuration → Attributes. Open the attribute and maintain the Elastic color or size codes on its values. Enable product variants in Sales settings if the Attributes menu is unavailable. From release 1.2.5, these codes live on attribute values.
Build the assortment
- Open Elastic → Configuration → Catalogs. Create a catalog with the code agreed with Elastic and assign the products.
- Assign the appropriate Elastic catalogs to customers on their Elastic tab.
- From Settings → Export Settings, run Generate Mappings after the assignments are ready, then include catalog and catalog-mapping exports in the test.
Publish the right price groups
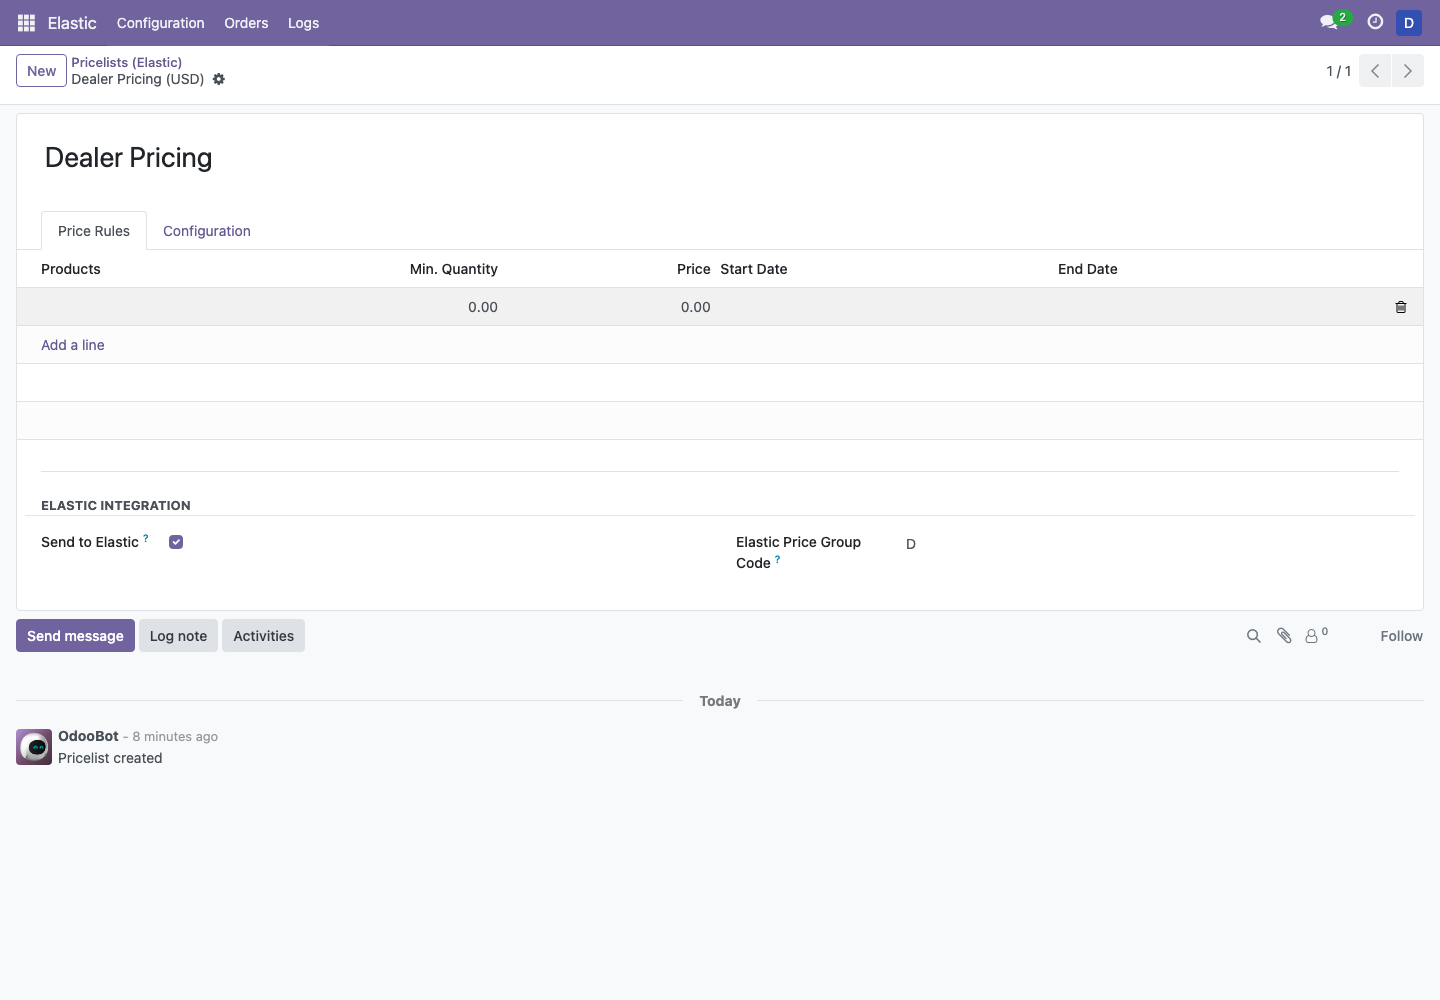
Open a pricelist in Sales, enable Send to Elastic, and set its Elastic Price Group Code to the agreed value. The Elastic → Configuration → Pricelists (Elastic) menu shows pricelists already flagged for Elastic; an existing unflagged pricelist must first be opened from Sales. Enable pricelists in Sales settings if needed.
 View full size ↗
If no pricelist is flagged, price export falls back to product list prices. If a flagged pricelist has no explicit group code, the connector derives one from its name. Set explicit codes and check the exported prices to avoid an unintended pricing tier.
Match customers & delivery addresses
Agree on the account identifiers used in both directions. In Settings → Business Logic, Use Legacy Account Number for SoldToID makes exports use the contact’s Legacy Account Number, falling back to its Odoo contact ID when blank. Populate and check those numbers if Elastic already has customer accounts.
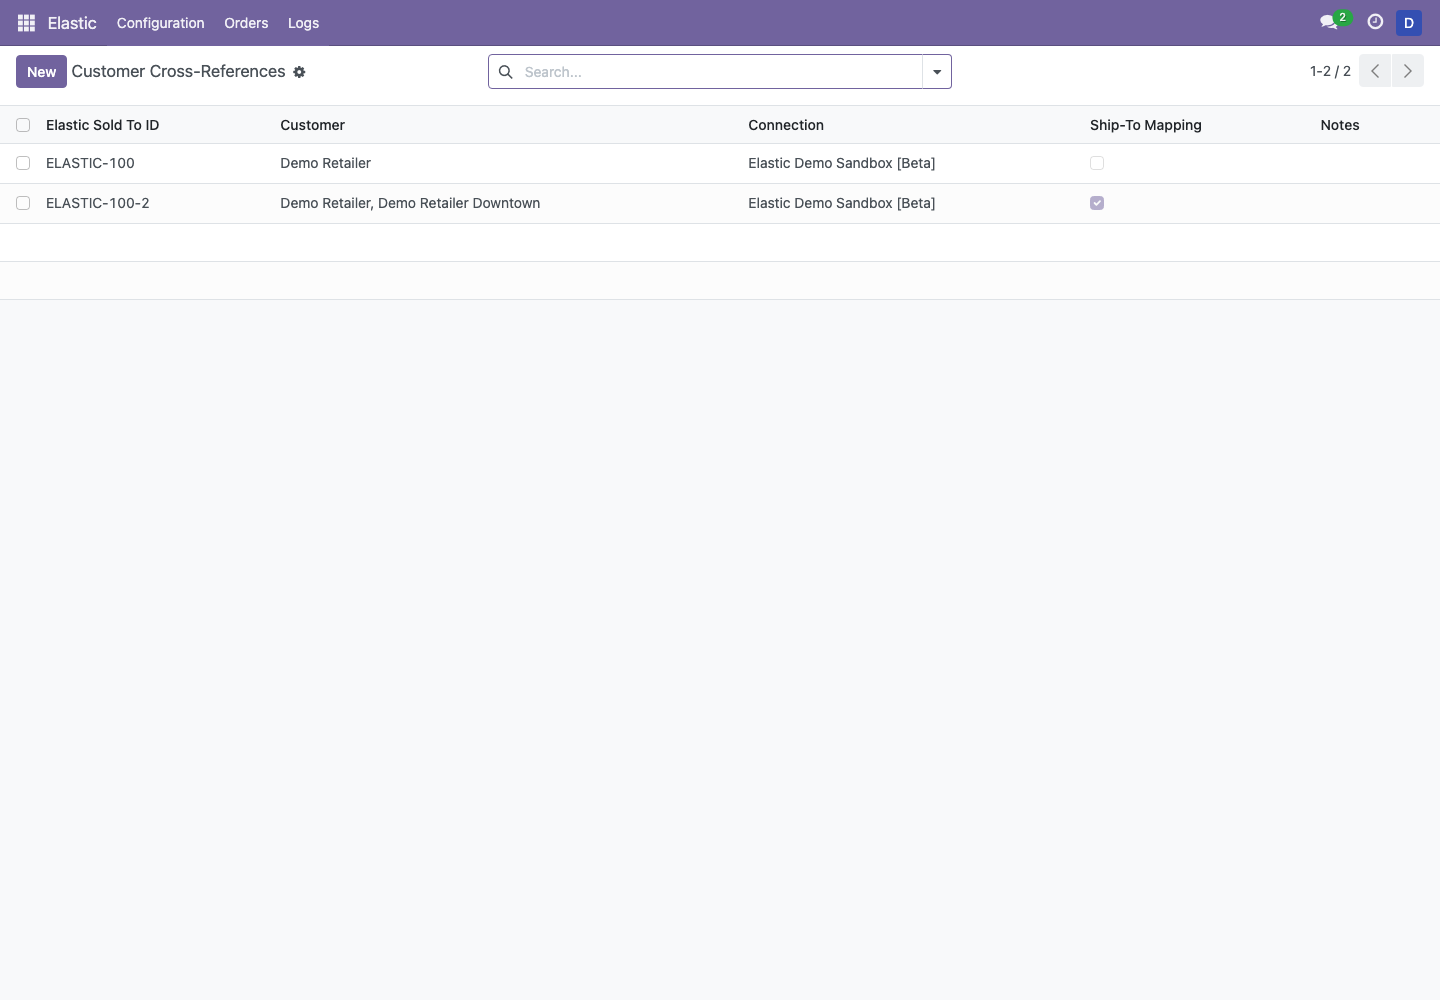
For imports, use Elastic → Configuration → Customer Cross-References to map the incoming Sold To ID to the correct Odoo customer. Set Connection to scope the mapping to a sandbox or production profile; leave it blank only when the mapping should be shared.
 View full size ↗
Create a second mapping for a separate Ship To ID, select the delivery contact, and enable Ship-To Mapping. For sold-to lookup, the connector checks the active connection’s cross-reference, then a global mapping, then Legacy Account Number. Setting the export option alone is not a substitute for matching incoming IDs.
A blank Ship To ID or SAME uses the sold-to contact. Otherwise the importer checks an existing delivery address’s legacy ID and cross-references; if none matches, it can create a delivery contact from the order’s address fields. Review the resulting shipping address in your test order.
Run & verify your first exports
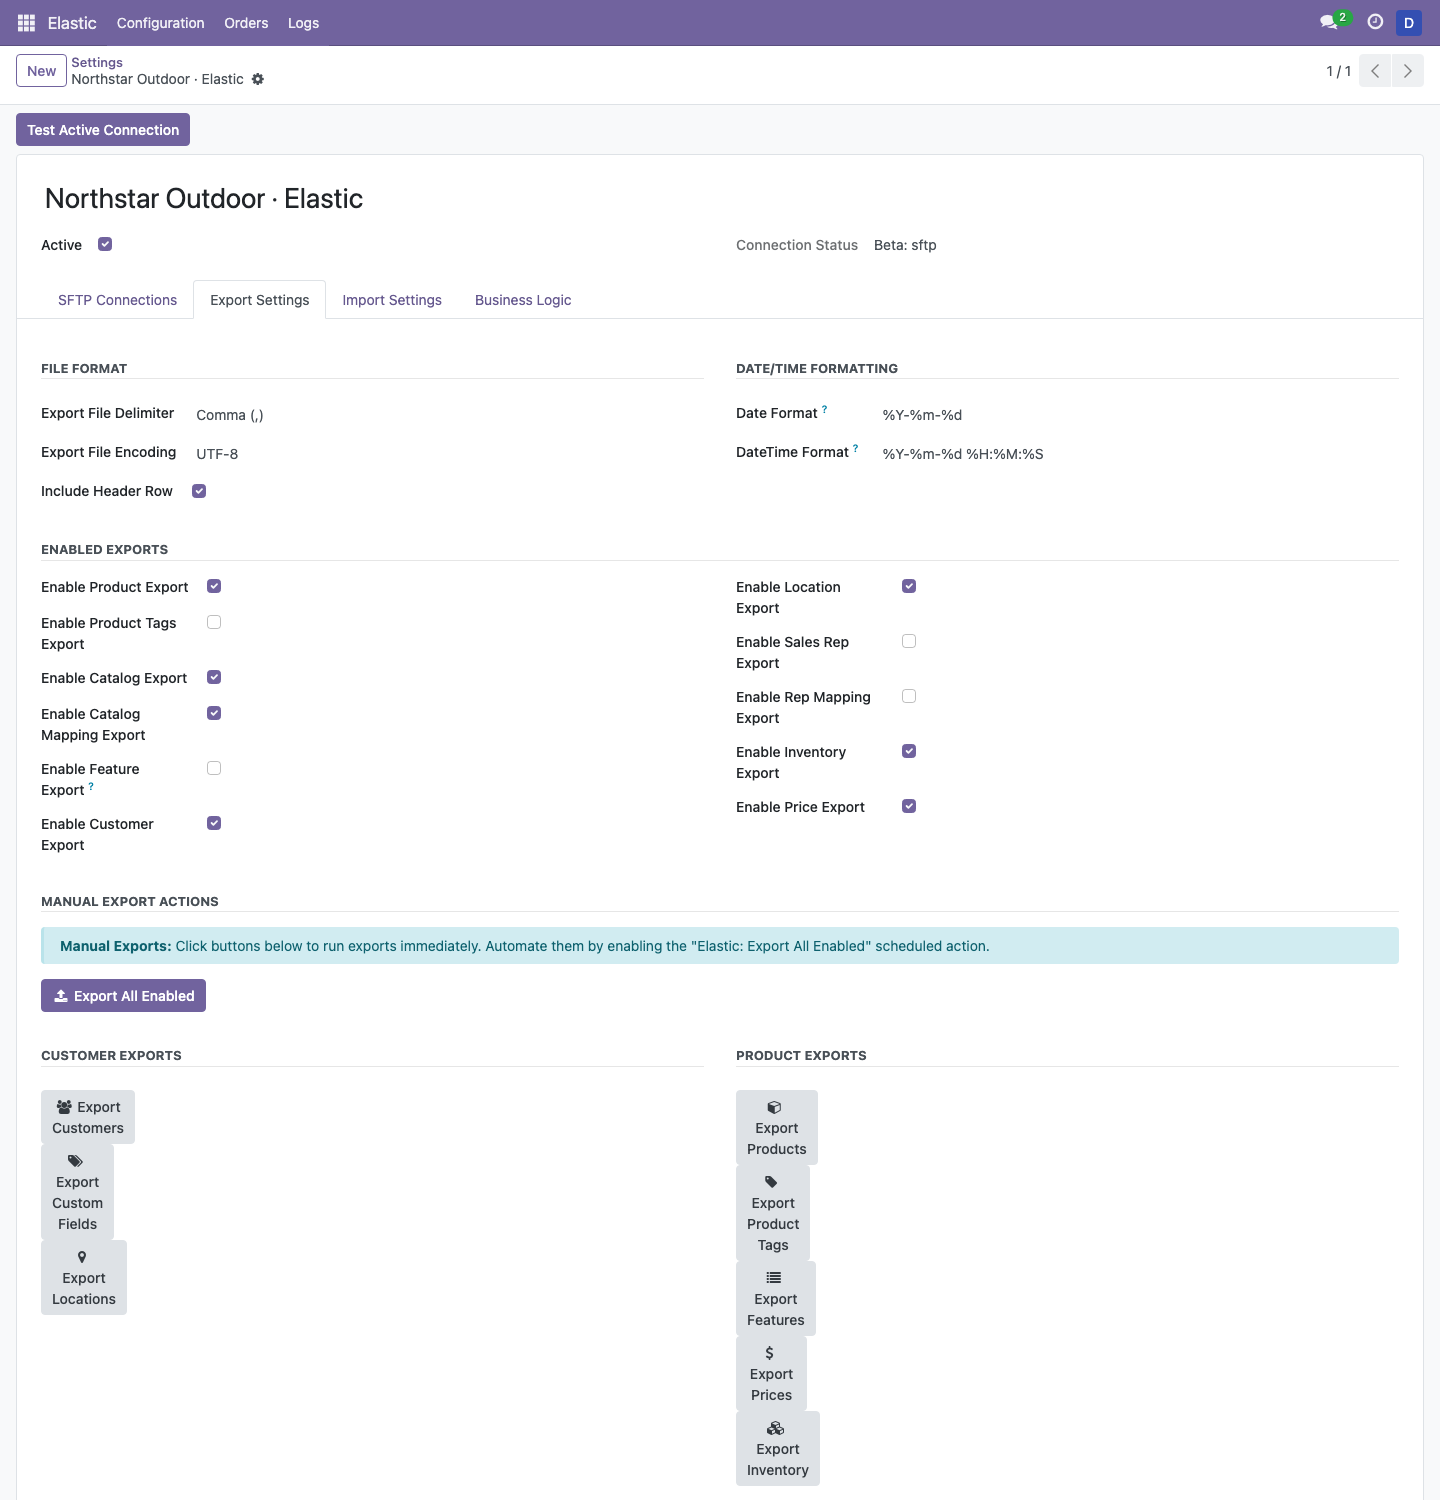
- In Settings → Export Settings, confirm the file delimiter, encoding, header option, and date/time formats with Elastic. The demo uses comma-separated UTF-8 files with headers.
- Enable only the feeds included in your implementation. A typical initial test includes products, customers, locations, catalogs and mappings, prices, and inventory. Features, product tags, and rep feeds are optional.
- Check the product and customer scope filters, save, and click Export All Enabled. Individual export buttons also run feeds manually; treat each click as a real exchange.
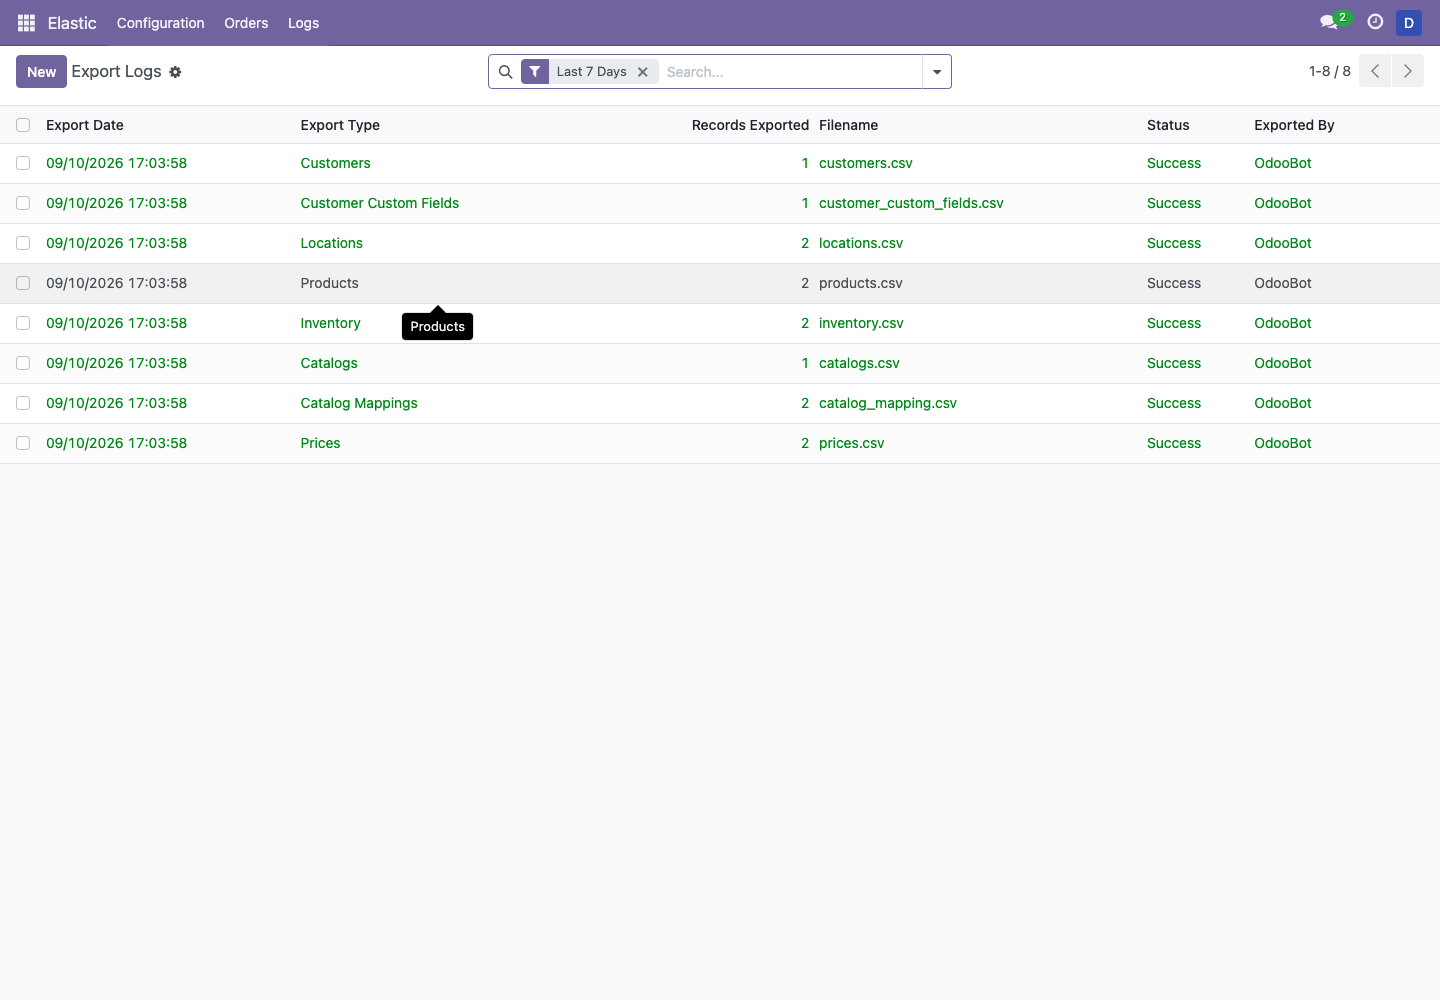
- Open Elastic → Logs → Export Logs. Inspect the result, filename, record count, and any error. Confirm the file arrived in the export directory.
- Ask Elastic to validate the sample catalog, account IDs, price groups, and availability. A successful upload does not confirm downstream ingestion.
 View full size ↗
See successful demo export logs
 View full size ↗
For availability, review Include Quotations in ATP Demand with your operations team. Enable Use BOM Component Fallback for ATP only if you need buildable component stock to contribute to availability; it requires the Manufacturing app.
Import a test order & review it
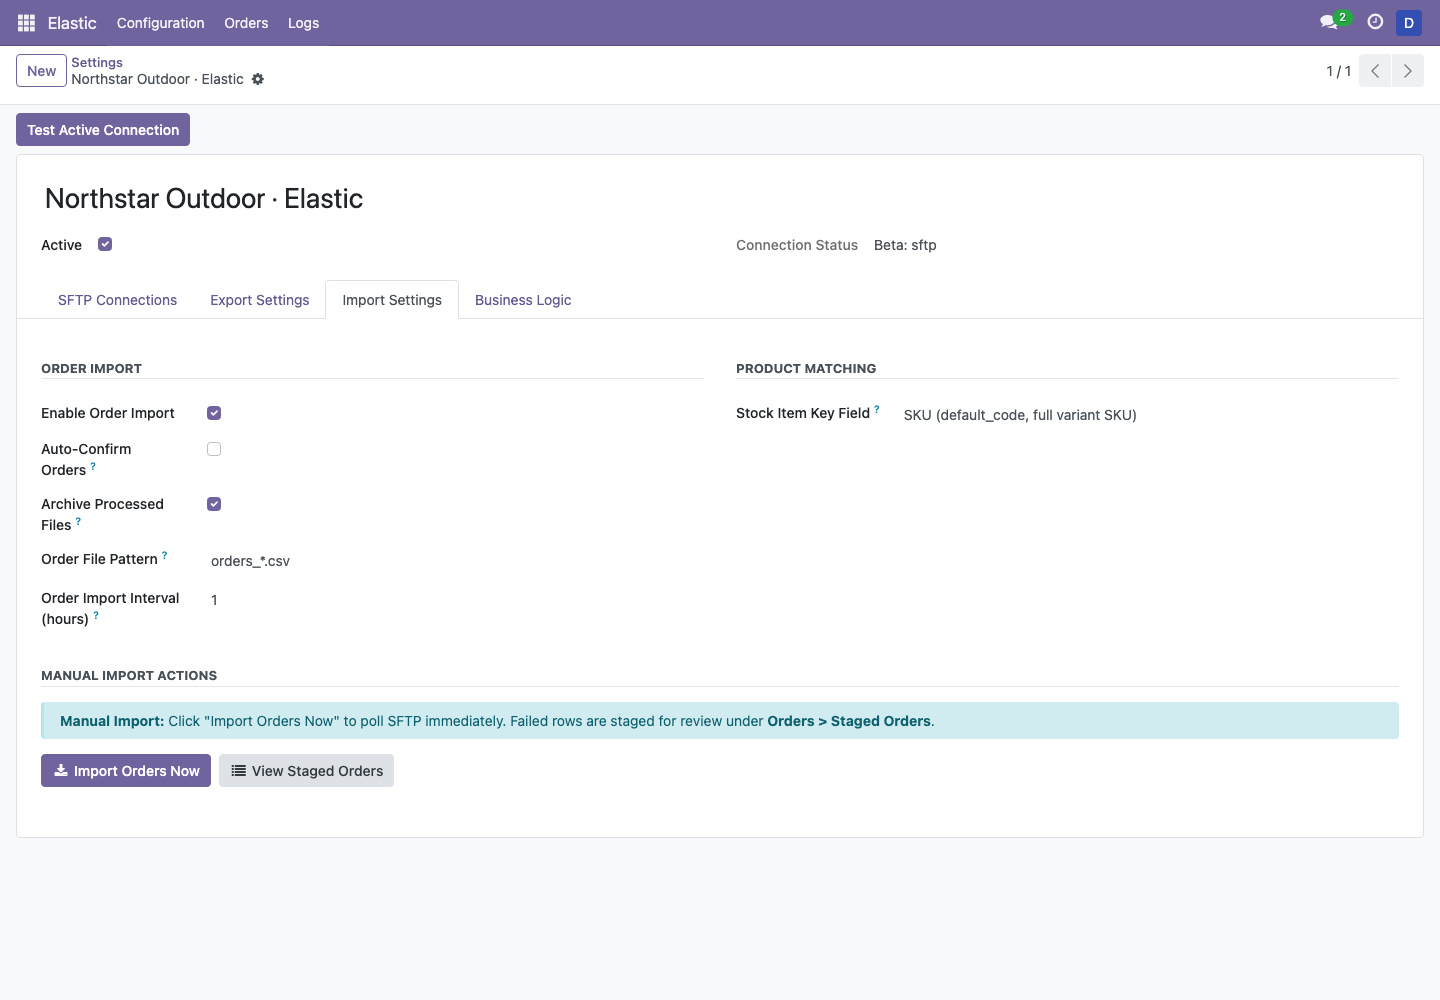
- In Settings → Import Settings, enable Enable Order Import. Keep Auto-Confirm Orders off for the first tests so successful imports remain draft quotations.
- Set Order File Pattern to match only order files, for example
orders_*.csv. Enable Archive Processed Files and verify that the SFTP account can move files into the archive directory. - Choose the Stock Item Key Field that matches the file: SKU for the full variant Internal Reference; UPC / Barcode for its barcode; or Product Number + Variation Code + Size for the combination supplied by Elastic.
- Have Elastic place a known test order in the import directory. Save and click Import Orders Now.
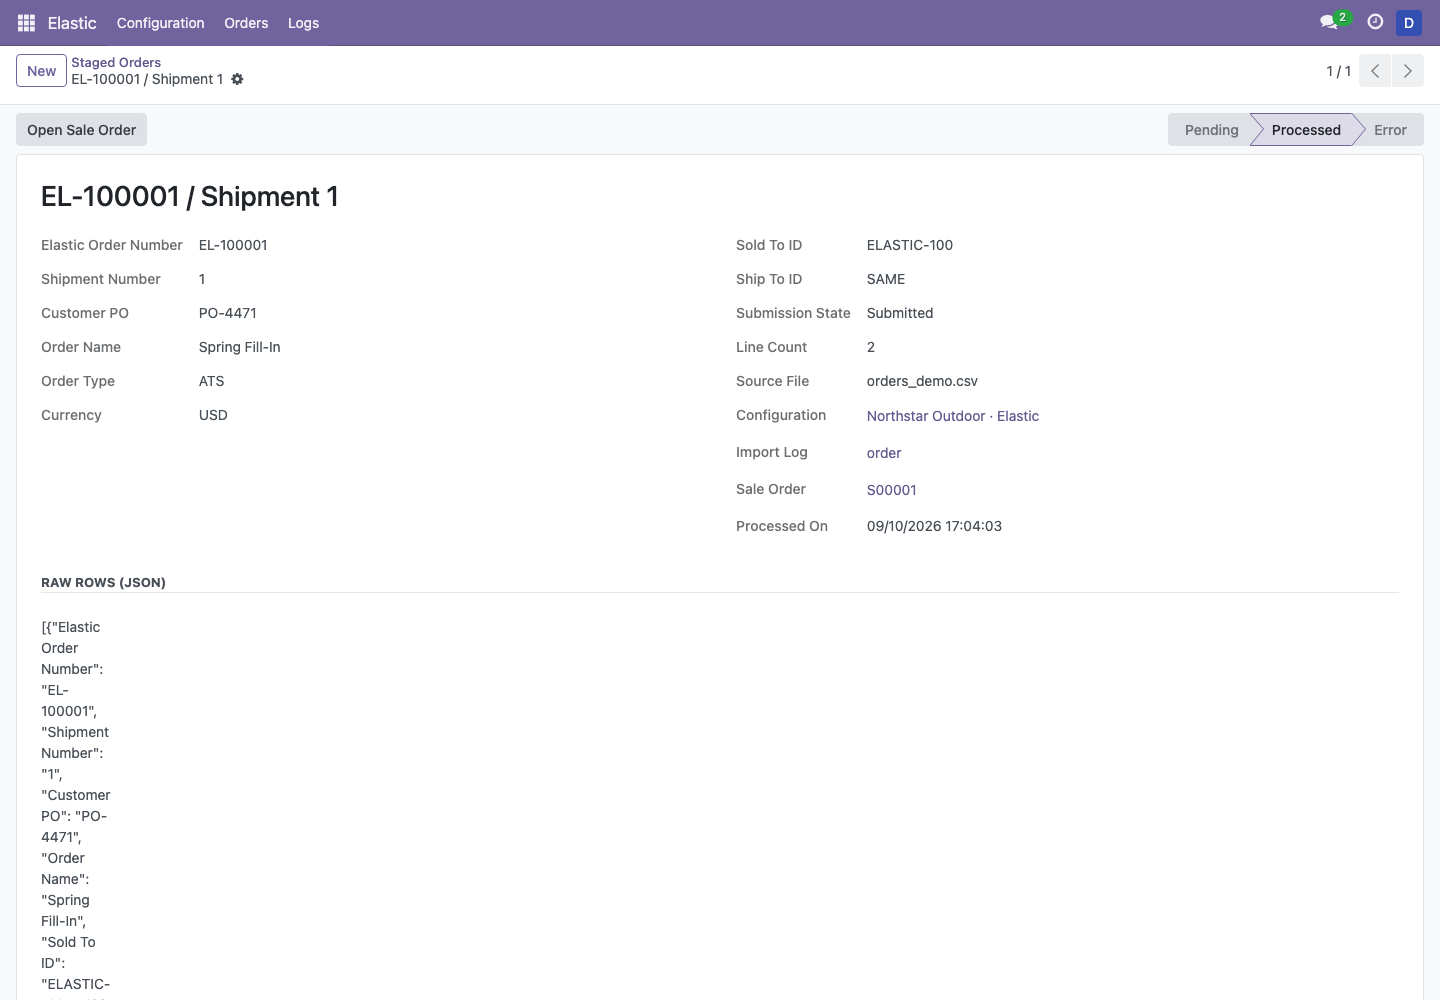
- Open Elastic → Orders → Staged Orders. Remove the default Error and Pending search filters to see successful imports. Open the staged record, then click Open Sale Order.
- Check customer, shipping address, variants, quantities, unit prices, currency, taxes, and requested shipping date. Confirm the quotation only when the result is correct.
 View full size ↗
 View full size ↗
Orders are grouped by Elastic Order Number and Shipment Number. If an Odoo order already exists for that pair, the importer marks another attempt as a duplicate. Use a new test order number for a new test; re-uploading an existing order does not update it.
Automate & move to production
The two Elastic scheduled actions are inactive when the module is first installed. Enabling a feed does not activate its schedule.
- Complete the sandbox checks with Elastic and your operations team: assortment, pricing, customer IDs, inventory, order details, and a failed-order retry.
- Create and verify a separate Production SFTP connection. Assign it in Settings. Review production customer mappings, directory paths, feed scope, and order filenames.
- Keep the scheduled actions inactive while switching Active Environment to Production. Save, run Test Active Connection, then perform a coordinated first export and order import.
- With developer mode active, open Settings → Technical → Scheduled Actions (under Automation in some layouts). Find Elastic: Export All Enabled and Elastic: Import Orders.
- Set the export interval and next run to your agreed schedule. Set Order Import Interval (hours) in Elastic’s Import Settings; saving it synchronizes the import scheduled action’s interval. Then activate the required actions and verify the next runs in the logs.
- Assign someone to review Import Logs, Export Logs, and staged errors regularly. Leave auto-confirm off until the business has approved automatic confirmation.
| Scheduled action | Initial interval | Runs |
|---|---|---|
| Elastic: Export All Enabled | Daily · inactive | The enabled outbound feeds |
| Elastic: Import Orders | Hourly · inactive | Order polling when import is enabled |
To pause exchanges, deactivate both Elastic scheduled actions and coordinate the pause with Elastic. Operators can still run manual buttons. Review any already-created orders before restarting, and confirm the active environment again.
When something needs attention
I cannot see the Elastic app or edit its settings.
Verify that the connector is installed and the user has Elastic access. Configuration changes require Elastic / Manager. Core products, sales, and stock records also require the corresponding Odoo rights. Reload after changing permissions.
The SFTP test fails, or the host key has changed.
Check the hostname, port, username, credentials, outbound network access, and any IP allowlist with your hosting provider. If the host key differs, have Elastic verify whether the server key was rotated before capturing a replacement. Do not bypass stored-key verification to resolve an unexplained mismatch.
An export succeeds but products, customers, or prices are missing.
Check the enabled feeds, Push to Elastic flags, and Export Only Synced filters. Confirm the product’s identifiers and catalog assignments. Check Send to Elastic and price group codes on pricelists, then compare log counts and actual files. Ask Elastic to check ingestion if the uploaded file is correct.
Import Orders Now finds no orders.
Verify the active environment, import directory, file pattern, and Enable Order Import. Check Import Logs and the archive folder. If the file imported successfully but staging looks empty, remove the default Error and Pending filters.
A staged order says “No Odoo customer found” or “Products not found.”
Compare Sold To ID with the correct connection’s customer cross-reference. Check the configured Stock Item Key Field against the exact variant SKU, barcode, or color/size combination. Fix the Odoo mapping or master data, then use Retry on the staged order. Review its Raw Rows to see the values actually received.
The order is marked Duplicate.
Open the linked sale order and compare its Elastic order and shipment numbers. An existing pair is skipped rather than imported again. Use a new order number for a separate test and agree a correction process for changes to an existing order.
A file will not archive, or keeps appearing again.
Check that the archive directory exists, the account can rename/move files, and a file with the same name does not already block the move. Review the import log and staging before retrying; a failed archive does not mean order creation failed.
Automatic runs have stopped.
Confirm that the configuration is active, the right connection is selected, the feeds are enabled, and the two scheduled actions are active with a sensible next run. Ask your Odoo administrator to check cron execution and the scheduled action’s user rights. Inspect the latest logs before manually rerunning.
For help, email support@p2bsi.com with Odoo 17, the connector version, operation time, environment, and relevant log message. Remove passwords, private keys, tokens, and customer information from anything you share.
Reference & upgrades
Optional feeds
Use Features, Product Feature Assignments, and Product Tag Mappings under Elastic → Configuration when those feeds are part of your Elastic setup. Optional Shopify Feature Imports reads Shopify product and metafield data when a manager runs Import Features; Shopify is not required for the standard connector workflow.
Example order file
Download the demo order CSV ↓. It matches the sample SKUs and customers shown here. It is a working example, not a universal Elastic file contract; confirm your own columns and formats with Elastic. The import parser uses the delimiter and encoding in Export Settings and expects column headers.
Upgrading an existing installation
Back up first and test the matching 17.0 package in staging. Upgrade the module through Apps after deploying the code. The 1.2.x migrations preserve configuration; upgrading to 1.2.5 moves color and size codes onto product attribute values. Check those values, host keys, feed scope, and a complete test exchange after upgrading. A major Odoo version migration is a separate project.
Related Odoo documentation
Screenshots captured from local Odoo 17 Community instances running connector 17.0.1.2.5 with fictional data and a local SFTP server. Verified September 10, 2026.
YOUR NEXT STEP
Make the first exchange a good one.
Need help mapping your catalog or bringing an existing Elastic account onto Odoo? We can work through it with you.